Friday, November 11, 2016

AEM 6.0 to AEM 6.2 Upgrade - crx2oak approach


This article mentions about the process of upgrade through the use of crx2oak migration tool.

On a high level, crx2oak tool not only does the upgrade from crx2 to crx3, it also does the repository to repository migration.

Below links gives some good documentation on crx2oak migration tool
https://docs.adobe.com/docs/en/aem/6-2/deploy/upgrade/using-crx2oak.html

I referred in place upgrade approach which is documented in the Adobe article to perform the upgrade from AEM 6.0 to AEM 6.2 from the below link
https://docs.adobe.com/docs/en/aem/6-2/deploy/upgrade.html

The in-place upgrade approach did not work as expected when done, there are some more extra steps which was done in order to make it work and this approach might change project to project. It is worth knowing what was done in order to have in place upgrade working. This is documented in my blog as well in a different post.


Below approach which is documented will focus not on the in place upgrade but rather than an approach of creating fresh instance and then migrating only selected paths from the AEM 6.0 repository to AEM 6.2 repository.

This approach has its own pros and cons depending on the project.

Few advantages,
a) Fresh instance without any orphaned version histories (GB's of data under /jcr:system/jcr:versionStorage)
b) No worries on the versions of the bundles which would not get upgraded and will stay as only installed state.
c) No chance of old legacy corrupted nodes continuing to stay in the upgraded instance, since this will be brand new.
d) Avoiding any extra manual steps which are involved in cleaning up of few files from the launchpad location as documented in my in place upgrade blog.
e) Lesser chance of indexes getting corrupted.


Below are the steps which needs to be followed to get the AEM 6.2 instance up and running with the migrated 6.0 repository content.

Step 1:
Create new AEM 6.2 instance with the mandatory run mode on the server with the below command.

Author:
java -Xmx8192m -jar AEM62-author-p4502.jar -r author,crx3,crx3tar,nosamplecontent

Publish:
java -Xmx8192m -jar AEM62-publish-p4503.jar -r publish,crx3,crx3tar,nosamplecontent

Note: Verify the error log and check the number of bundles in the web console.

Step 2:
Once login screen appears, login with admin credentials and install the latest AEM 6.2 compliant code.

Note: If your project contains the inclusion of ACS commons pacakge and bundle through pom.xml then make sure you increment the version to the latest supported by AEM 6.1/6.2.
You could visit this link to get the latest version of the package.
https://github.com/Adobe-Consulting-Services/acs-aem-commons/releases

At the time of writing this article: 3.4.0 version of AEM ACS commons package (acs-aem-commons-content-3.4.0.zip) is the latest supporting AEM 6.2.

Step 3:
Post the installation is complete, On the author/publish instance, change the start.sh file with appropriate values as shown below since the default one would have hard coded default values and it requires changes.

a) Stop the instance using "kill -9 <process ID>
You could know the Process ID by using the command "ps -ef | grep java"

b) Edit the start file by visiting to the installed location (Example: vi /opt/apps/aem/crx-quickstart/bin/start) under bin folder with the below changes. (For each environment, specify the right run modes).


For Author
if [ -z ""$CQ_RUNMODE"" ]; then
        CQ_RUNMODE='author'
fi
CQ_RUNMODE=""${CQ_RUNMODE},crx3,crx3tar,nosamplecontent,customrunmode""
CQ_PORT=4502

For Publish
if [ -z ""$CQ_RUNMODE"" ]; then
        CQ_RUNMODE='publish'
fi
CQ_RUNMODE=""${CQ_RUNMODE},crx3,crx3tar,nosamplecontent,customrunmode""
CQ_PORT=4503

Common change: 
CQ_JVM_OPTS='-server -Xmx8192m -XX:MaxPermSize=2048M -Djava.awt.headless=true'"

Note: Memory arguments is totally dependent on the server configurations and this has to be calculated based on the Infra architecture in the project.

c) Start the instance using ./start and if the instance is up and running without any issues then shut down the instance using ./stop command.
Note: Instance should not be running when the migration is started hence stopping the server.

Step 4:

"Download ""crx2oak-1.4.6-standalone.jar"" from the link https://repo.adobe.com/nexus/content/repositories/public/com/adobe/granite/crx2oak/1.4.6/

Note: you could go one level back and choose any latest version to download."

Step 5:
This is optional step which allows monitoring of the logs through the log monitor.log which would get created.
Download "logback.xml" from the link
https://docs.adobe.com/content/docs/en/aem/6-2/deploy/upgrade/using-crx2oak/_jcr_content/contentbody/procedure/proc_par/step/step_par/download/file.res/logback.xml

Step 6:
Place both jar file and the XML file in a directory (say /opt/apps/migrationtool).

Step 7:
Stop the source (6.0) instance and destination (6.2) instance.
Try to have the 6.2 and 6.0 in the same server so that the migration tool when runs need not worry about the network latency across servers and other complications.

Step 8:
Run the below command from the migrationtool directory. This command would migrate the version storage of non-orphaned versions from source to destination.


On author: (if user groups is also going to be migrated from old instance to new instance then you could run the below command which includes permission store + follow my user group migration post)

java -Dlogback.configurationFile=logback.xml -Xmx8192m -XX:MaxPermSize=2048M -jar crx2oak-1.4.6-standalone.jar --copy-versions=true --copy-orphaned-versions=false --fail-on-error=true /opt/apps/AEMProd60/crx-quickstart/repository /opt/apps/AEMProd62/crx-quickstart/repository --include-path=/content/testingapp,/content/campaigns,/content/dam,/etc/segmentation,/etc/commerce/products/testingapp,/etc/tags,/etc/cloudservices,/etc/blueprints,/etc/replication,/jcr:system/rep:permissionStore  --merge-path=/jcr:system/rep:permissionStore

On author: (if user nodes are going to be created through the process of logging in to the system and manually creating groups and assigning permissions)

java -Dlogback.configurationFile=logback.xml -Xmx8192m -XX:MaxPermSize=2048M -jar crx2oak-1.4.6-standalone.jar --copy-versions=true --copy-orphaned-versions=false --fail-on-error=true /opt/apps/AEMProd60/crx-quickstart/repository /opt/apps/AEMProd62/crx-quickstart/repository --include-path=/content/testingapp,/content/campaigns,/content/dam,/etc/segmentation,/etc/commerce/products/testingapp,/etc/tags,/etc/cloudservices,/etc/blueprints,/etc/replication

On publish:

java -Dlogback.configurationFile=logback.xml -Xmx8192m -XX:MaxPermSize=2048M -jar crx2oak-1.4.6-standalone.jar --fail-on-error=true /opt/apps/AEMProd60/crx-quickstart/repository /opt/apps/AEMProd62/crx-quickstart/repository --include-path=/content/testingapp,/content/campaigns,/content/dam,/etc/segmentation,/etc/commerce/products/testingapp,/etc/tags,/etc/cloudservices,/etc/blueprints,/etc/replication


Step 9:

There are high chances that after Step 8, Once server started, start up service will look for the bundles it has to start and would take a good amount of time to start and sometimes can hang the server.
If you get to this state then stop the server and remove the indexes.
a) Traverse to index folder of AEM 6.2 under .../crx-quickstart/repository/index
b) Delete all the indexes using rm -rf *

Step 10:
Traverse to crx-quickstart/bin folder and start the instance using ./start command.

Note: Watch out for error log, there would be some exceptions regarding the indexes not found. This is natural since we cleaned up indexes.
Wait for the server to start up completely.
Once the instance starts up, shutdown the instance again and restart it so that the re-indexing gets fired up in the back end without exceptions.

Enjoy!!!

Tuesday, October 4, 2016

Enabling CRXDE in AEM

I am writing this post to share my findings on enabling CRXDE when the AEM is started in the production run mode (i.e. with nosamplecontent mode).

Please refer the below URL to know how to start the AEM instance in the production run mode where all the security features are enabled.
https://docs.adobe.com/docs/en/aem/6-2/administer/security/production-ready.html


After this if in any case, CRXDE needs to be enabled, then the usual way is to verify if the below bundles are active and running

  1. CRXDE support bundle (Adobe Granite CRXDE Lite - com.adobe.granite.crxde-lite)
  2. WebDav bundle, (Apache Sling Simple WebDAV Access to repositories - org.apache.sling.jcr.webdav)
  3. DavEx bundle (Apache Sling DavEx Access to repositories - org.apache.sling.jcr.davex)


By just making sure having this active would not have CRXDE enabled.

You would also find that there would be 404 for the below URL hit
/crx/server/crx.default/jcr:root/.1.json

At this point, you would have also verified the ACL's permissions for the admin user and might be thinking where is the missing link.

The catch here is to do one more step for enabling CRXDE. That is - Go to configuration manager and edit the below configuration
"Apache Sling DavEx servlet" to have the "Root Path" value as "/crx/server" instead of "/server".


Apache Sling DavEx Servlet


Verify now in CRXDE if you could see all the structure in place!!!

Note:

Below link would lead you to /system/console/components but you would not find this in there and you have to visit the "configMgr" as noted above for having the CRXDE enabled.

https://docs.adobe.com/docs/en/aem/6-2/administer/security/security-checklist/enabling-crxde-lite.html

Saturday, August 6, 2016

AEM - Processing SAML Response

Brief Note


There might be lot of articles which you might have read by now on the how to set up SAML authentication in AEM, configuring various options on AEM and on IDP provider side.

Few articles which I have read myself and enjoy reading it are listed below.


Useful References:

https://helpx.adobe.com/experience-manager/kb/saml-demo.html
http://www.aemstuff.com/blogs/july/saml.html
http://adobeaemclub.com/setting-saml-authentication/


Important information which I did not get while doing study was on how to process the SAML response which is received and what are the details which should be accounted for while implementing the same.

This article covers some of the findings which I had gone through in my study, some lesson learnt and things to look out for.


Processing SAML response using Authentication Info Post Processor


package com.ag.blog.agblog.core.postprocessors;

import java.io.IOException;
import java.io.StringReader;
import java.io.UnsupportedEncodingException;
import java.util.HashMap;
import java.util.Map;
import java.util.Set;

import javax.servlet.http.HttpServletRequest;
import javax.servlet.http.HttpServletResponse;
import javax.xml.parsers.DocumentBuilder;
import javax.xml.parsers.DocumentBuilderFactory;
import javax.xml.parsers.ParserConfigurationException;

import org.apache.commons.lang3.StringUtils;
import org.apache.felix.scr.annotations.Component;
import org.apache.felix.scr.annotations.Reference;
import org.apache.felix.scr.annotations.Service;
import org.apache.sling.api.resource.LoginException;
import org.apache.sling.auth.core.spi.AuthenticationInfo;
import org.apache.sling.auth.core.spi.AuthenticationInfoPostProcessor;
import org.apache.sling.settings.SlingSettingsService;
import org.slf4j.Logger;
import org.slf4j.LoggerFactory;
import org.w3c.dom.Document;
import org.w3c.dom.Node;
import org.w3c.dom.NodeList;
import org.xml.sax.InputSource;
import org.xml.sax.SAXException;


@Component(immediate = true, metatype = false)
@Service
public class SAMLResponsePostProcessor implements AuthenticationInfoPostProcessor {

private static final Logger LOGGER = LoggerFactory.getLogger(SAMLResponsePostProcessor.class);

@Reference
private SlingSettingsService slingSettingsService;

public void postProcess(AuthenticationInfo info, HttpServletRequest request, HttpServletResponse response)
throws LoginException {
HttpServletResponse httpResponse = null;
HttpServletRequest httpRequest = null;
try {
LOGGER.info("SAMLResponse Post Processor invoked");
httpResponse = response;
httpRequest = request;
String pathInfo = httpRequest.getPathInfo();
Set<String> runModes = slingSettingsService.getRunModes();
if (runModes.contains("publish") && StringUtils.isNotEmpty(pathInfo)
&& pathInfo.contains("saml_login")) {
LOGGER.info("SAMLResponse Post Processor processing ...");
String responseSAMLMessage = httpRequest.getParameter("saml_login");
if (StringUtils.isNotEmpty(responseSAMLMessage)) {
LOGGER.debug("responseSAMLMessage:" + responseSAMLMessage);
String base64DecodedResponse = decodeStr(responseSAMLMessage);
LOGGER.debug("base64DecodedResponse:" + base64DecodedResponse);
parseSAMLResponse(httpResponse, httpRequest, runModes, base64DecodedResponse);
} else {
LOGGER.info("responseSAMLMessage is empty or null");
}
}
} catch (ParserConfigurationException e) {
LOGGER.error("Unable to get Document Builder ", e);
} catch (SAXException e) {
LOGGER.error("Unable to parse the xml document ", e);
} catch (IOException e) {
LOGGER.error("IOException ", e);
}
}

/**
* This method will parse the SAML response to create the Cookie by reading the attributes.

* @param httpResponse
* @param httpRequest
* @param runModes
* @param base64DecodedResponse
* @throws ParserConfigurationException
* @throws SAXException
* @throws IOException
* @throws UnsupportedEncodingException
*/
private void parseSAMLResponse(HttpServletResponse httpResponse, HttpServletRequest httpRequest,
Set<String> runModes, String base64DecodedResponse)
throws ParserConfigurationException, SAXException, IOException, UnsupportedEncodingException {
DocumentBuilderFactory documentBuilderFactory = DocumentBuilderFactory.newInstance();
documentBuilderFactory.setNamespaceAware(true);
DocumentBuilder docBuilder = documentBuilderFactory.newDocumentBuilder();
Map<String, String> samlAttributeMap = new HashMap<String, String>();
StringReader strReader = new StringReader(base64DecodedResponse);
InputSource inputSource = new InputSource(strReader);
Document document = docBuilder.parse(inputSource);
NodeList samlAssertion = document.getElementsByTagName("saml:Assertion");
populateSAMLAttrMap(samlAttributeMap, samlAssertion);
}

/**
* This method would populate the SAML attribute map object based on the attributes present in the response.

* @param samlAttributeMap
* @param samlAssertion
*/
private void populateSAMLAttrMap(Map<String, String> samlAttributeMap, NodeList samlAssertion) {
for (int i = 0; i < samlAssertion.getLength(); i++) {
Node item = samlAssertion.item(i);
NodeList childNodes = item.getChildNodes();
for (int j = 0; j < childNodes.getLength(); j++) {
Node subChildNode = childNodes.item(j);
if (subChildNode.getNodeName().equalsIgnoreCase("saml:AttributeStatement")) {
NodeList childNodes2 = subChildNode.getChildNodes();
for (int k = 0; k < childNodes2.getLength(); k++) {
Node item2 = childNodes2.item(k);
if (item2.getNodeName().equalsIgnoreCase("saml:Attribute")) {
String attributeValue = item2.getAttributes().item(0).getNodeValue();
NodeList attributeValueNodeList = item2.getChildNodes();
for (int l = 0; l < attributeValueNodeList.getLength(); l++) {
if (attributeValueNodeList.item(l).getNodeName()
.equalsIgnoreCase("saml:AttributeValue")) {
samlAttributeMap.put(attributeValue,
attributeValueNodeList.item(l).getTextContent());
}
}
}
}
}
}
}
}

/**
* This method would decode the SAML response.

* @param encodedStr
* @return
*/
public static String decodeStr(
String encodedStr) {
String decodedXML = "";
org.apache.commons.codec.binary.Base64 base64Decoder = new org.apache.commons.codec.binary.Base64();
byte[] xmlBytes = encodedStr.getBytes();
byte[] base64DecodedByteArray = base64Decoder.decode(xmlBytes);
decodedXML = new String(base64DecodedByteArray);
return decodedXML;
}

}


Lesson Learnt and things to look out for in the investigation of SAML response


Misunderstanding encoded response with encrypted response


Sometimes you would get confused between the encoded SAML response with the encrypted SAML response.

To always verify that, use the below link and paste the SAML response on the same. Select "post" option and click on decode it button.

This will show you the decoded response. Verify if all the attributes sent from the IDP provider is present or not.

https://idp.ssocircle.com/sso/toolbox/samlDecode.jsp


SAML response posting forbidden error


When IDP posts the SAML response to AEM, the IDP provider would configure the domain name with the context path containing /saml_login.

As we know that the domain would be configured to point to LB from Akamai CDN (if used) then to dispatchers and dispatchers to AEM publish instances.

Like Movie where predictions are done by all of us while watching it, likewise, people now might be predicting that some kind of dispatcher configurations needs to be done to hand over the SAML response to reach AEM instance.

Correct, in the dispatcher configuration file go ahead and add below rule to connect dispatcher and AEM for SAML response.

/filter
{
 ....

 ....
/0055 { /type "allow" /url "/saml_login" }

.....
.....
}


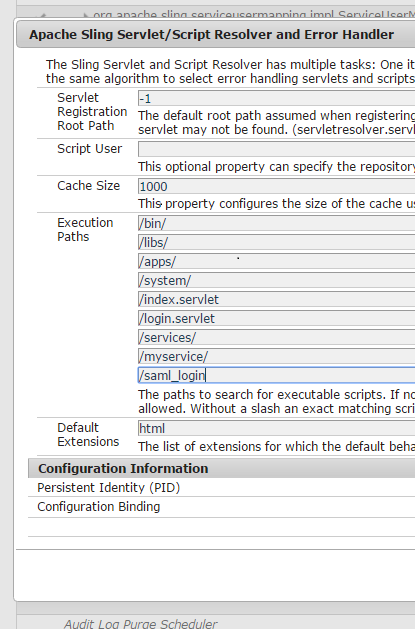
Prediction is not ending here, people who know "Apache Sling Servlet/Script Resolver and Error Handler" will think of allowing "saml_login" context path.

Yes, Go to configuration manager in the web console of the instance and add the context path "saml_login".

This is the manual change which I am showing. In one of my article you would also see how you can make this part of your code base.


SAML Response can be read only once in the life cycle


Lot of times you would think that you can use normal filters to take care of the reading of SAML response, but eventually you would end up having null pointer exceptions since the filters get executed twice in the life cycle.

SAML response can be read only once since the "saml_login" parameter which will hold the response will be read in an special class from one of the bundle in AEM which is ""com.adobe.granite.auth.saml.binding.PostBinding" class.

Filters would not work for this reason and you need to go ahead with Post processors to read it once PostBinding class which is at the same level of ranking to read the SAML response before response is set to NULL.


Intent of "saml_request_path" cookie


Lot of times you might need to land to the same page in AEM where you have clicked on the login link and this is achievable if you read the value from the "saml_request_path" cookie on page load or from back end when the control comes back to AEM instance from the IDP server.


This "saml_request_path" cookie is created by the class "com.adobe.granite.auth.saml.SamlAuthenticationHandler" in the method requestCredentials().


There would be implementations where you feel like hitting the respective environment IDP URL on click of login, during this time make sure that you have a logic in your code to create the "saml_request_path" cookie with the path set to the current page by reading from the request object (or any other logic).